
(Note: This post is LONG, and mostly for us and our blog book, but scan through and check out the pics - pretty great)
We bought our house in December 2005 and our kitchen was in horrible condition. I mean, bad. BAD.
We knew this home would be a little fixer-upper along the way and we've constantly had projects and renovations going, but the kitchen has proved to consume the most time and energy over every other project. We have been working on the kitchen/dining room off and on from day one, for 5 1/2 years now and we are extatic to say that IT IS FINALLY DONE! Back in April we finally finished everything we had originally set out to do, and more, and we absolutely LOVE the end!
Here is a quick BEFORE and AFTER reveal:
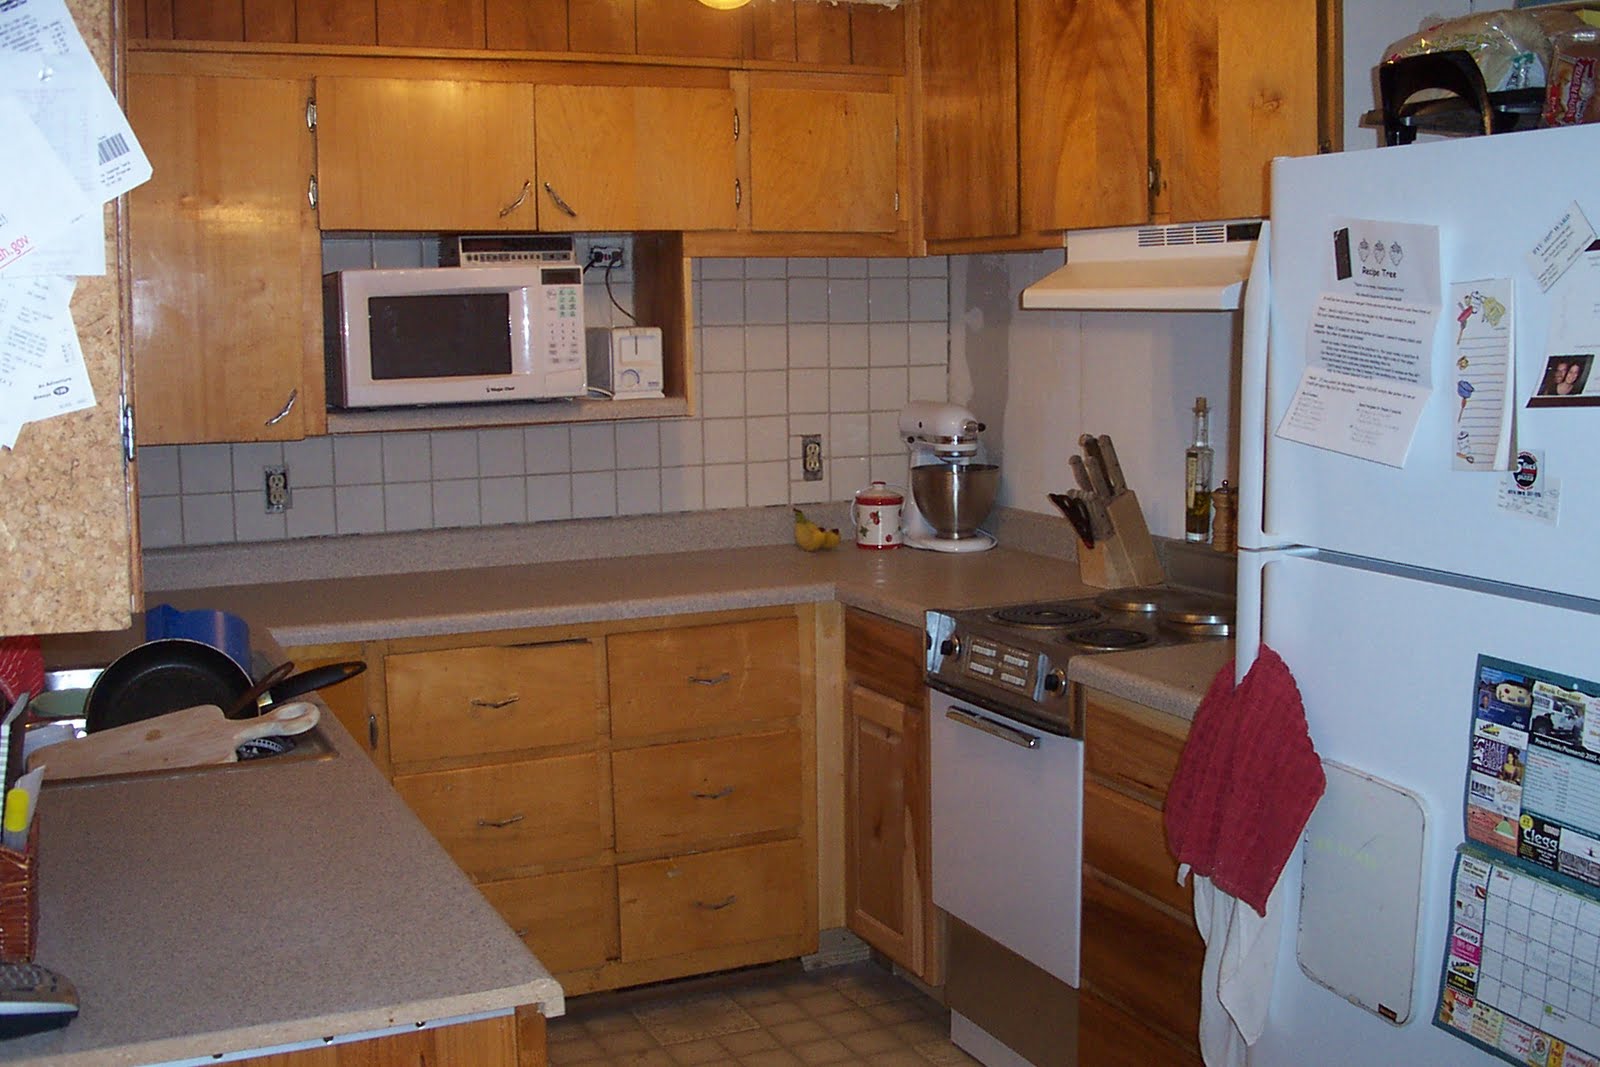
KITCHEN BEFORE:

KITCHEN AFTER:
 I think the fridge and the sink are the only things in the same place. :-) These are both taken from the same view - this is what you see to the left when you enter our house from the side door.
BEFORE:
(view of kitchen when standing in dining room)

AFTER:

DINING ROOM BEFORE:

DINING ROOM AFTER:

BEFORE:

AFTER:

Pretty amazing huh? It has been a process and a half, but we have loved making our home what we want and doing it ourselves.
While compiling all of the "house" photos we've taken along the way, I found this gem...

This was a valentine that Ben gave me way back in 2008. Or was it 2007? Either way, it was a long time ago. And I held onto this puppy to remind him of his promise, the key-word being "no-complaint". ha ha.
I pinned the Valentine (which he creatively made out of paint samples, did you catch that?) to the nasty cork board that was right by our front door, glued to the side of our kitchen cabinets. I had forgotten about it until I was clearing the cork board off to be torn down during the reno back in April.
I think it only took me a couple years to redeem that coupon (thanks Ben!) and even at that, I was the one who painted the kitchen and half of the cabinets in the end. But Ben, being the handy man he is, did the hard stuff - all of the reconstructing.
Here's our kitchen/dining room over the years:
 This is what our house looked like when we bought it, before we moved in.
1.) Days before closing on the house we discovered there were two gas leaks in the house (one in our wall furnace and one in the ancient oven pictured above), because the genius home inspector didn't catch it the first time around. Duh.
It was a short sale, so all the bank was willing to do was give us a $500 stipend to fix it.... and we all know how far $500 goes. Right.
So we had Questar come in and do a quick fix on the gas leaks so the house wouldn't explode. Then in January 2006, before we moved in, my wonderful Dad (and Mom) drove down to help us repair everything.
We couldn't use the gas line into the kitchen and therefore couldn't put in another gas oven and stove top. But there wasn't an outlet in the kitchen that would support an electriv oven so we were stuck. BUT lucky for us my Dad is an electrical contractor! So he brought a small apartment-sized oven down with him and everything he would possibly need to renovate our kitchen a bit.
2.) So Ben and my Dad went to work in the kitchen and one thing led to another. They tore out the old oven and stove top, tore out old cabinets, rewired the kitchen's electricity and added new outlets (brilliant!) and worked some magic with dry wall. Then because the stove top left a gaping hole in the counter top, they just tore all the counter off. Then they built some custom cabinetry reusing some of the old pieces, added new cabinetry to change it from an L-shaped to U-shaped kitchen and then topped it off with great new counter tops. Phew. Mom and I cheered them on and cleaned.
My parent's goal was to get the kitchen to a nice functioning state so we could move in and they did just that. I think this was all on an $800 budget and it was about right. They saved us - thanks Mom and Dad!
 Counter tops torn off, sink out temorarily, they created a new, custom lazy-susan door.
 Stove top and wall oven torn out, corner cabinetry torn out, new oven and cabinetry in place.
 Ben and Dad at work installing the counter tops and sink, built a microwave shelf from extra counter top material.
 Upper corner cabinets built and everything almost in place.
3.) Bought new fridge (to replace the one above) from a guy for $100 - amazing deal for us, what a blessing.
 4.) I tiled the back splash while Ben bricked the fireplace in the living room.
This is what our kitchen looked like after my Dad's renovations and after the tiling. It stayed this way for a couple years while we worked on other parts of the house.


(Note: pictures of the following steps have been lost... two years of pictures were destoryed on a hard drive crash. )
5.) In 2007, put pergo flooring in the kitchen and second bedroom. Before we had a baby crawling all over the floor we wanted something nicer down in the kitchen and his room. Something that wasn't from 1970. I think we did this either right before we had Logan.
6.) In about 2006 or 2007, Ben tore out our drawers and built shelves instead. After finding mice crawling through all of the contents of my drawers, I decided something had to change. It was much easier to store things on shelves instead of drawers anyway.
7.) We inherited a new chandelier from Andy and Gav for our dining room. Thanks a ton!
8.) 2008, Ben gave me a coupon for new paint for the walls and cabinets and I take forever deciding what comes first, the chicken or the egg? Do we redo the dining room or kitchen first? Do I stain or paint the cabinets? Do I paint the wood paneling? Do I use a distressing glaze or just a plain color? Accent wall or no accent wall? The choices were endless and I didn't know where to start.
9.) In 2009 (I think) I painted the wood bead board in the dining room an ivory color. Then use a distressing glaze over it. I hated it immediately, but didn't know where to go from there.
10.) I painted samples of three different colors all over my dining room and kitchen to see them all in different lights. I hated all the colors and was stuck. I wanted a robin's egg blue and couldn't find the shade that was just right. I gave up.
11.) The kitchen and dining room stayed hideous like this for WAY TOO LONG!
 See those colors on the wall behind my mom? Those were the beautiful colors I saw everyday for about two years. UG-LY. I lovingly referred to them as my calico walls.
 12.) Ben replaced the side door Early Spring 2010. After a major scare I had while Ben was gone for two weeks during a business trip, I demanded that I either needed a safer door or a hand gun before Ben left town again. :-)
 The old door... what do you think, 50's? 70's? All I know is it was single-pane, hideous and an easy target for a break in. We couldn't even dead bolt it most of the year (depending on temperature and humidity).
While the door and threshold were off we could see all of the layers of our flooring in our house - way cool! It was kind of like seeing history from 1931 until now.
 As with all of our projects on this beauty of a 1931 house, what was supposed to be a 3-hour project turned into an ALL DAY project. Luckily Daniel helped for a few hours and our friend, Richard, helped for endless hours after that.
 13.) Weevil infestation. Beginning of November 2010 I moved everything completely out of the kitchen to clean and sanitize every crack and corner. Turns out wevels love d-con and thrive on it. Odd huh? They were spawning from an open case of d-con that I had stored under our oven for mice control. *shudder out of disgust* This took a week full of late, late nights to complete.
14.) I FINALLY got inspiration of what I wanted to do with the dining room and kitchen: Green, white and red color scheme, board and batten in the dining room and white kitchen cabinets.
15.) We started paining first. This is all a couple weeks before Thanksgiving 2010, which we were hosting at our house this year. There's nothing like a good, solid deadline for a little bit of pressure and motivation, right? :)
 We needed to tear off the wood bead board before we could start paining. Yes, the same wood bead board that I painted just a year or two earlier. :)
As we ore off the boards that were glued to the dry wall, the dry wall was just crumbling in some places. Once we tore it all off and saw what crappy condition it was in there was a big debate whether or not we need to actually tear out the dry wall and start from scratch. Ben determined he could do some major patches and make it work. So I proceeded with painting.
 Here you can see all the dry wall patches that Ben had to do(down by the door and all of the white patches and all around the side and top of the window). The tricky part is that the dry wall that is in our kitchen is actually thinner than the dry wall they make these days, so Ben had to some some smooth work to make it all flow well.
  What a mess
 16.) Finished painting the dining room and kitchen green and hated the shade. It looked great in the sample I painted on the walls (flat paint), but then we painted with semi-gloss and that was enough sheen to lighten the color to be a little too lime for my liking. It has grown on me since, though.
17.) Started on the board and batten November 2010 - still before Thanksgiving. I got my inspiration from a few different blogs who all bragged about it's simplicity (and under usual circumstances it does seem to be very simple). However because this is an old house with many former tenants who seemed to think that short cuts and crappy work was ok, this project turned out more expensive and extensive than it could have been. :) I think we were at the hardware store just about every day during the month of November.
 Bought large sheets of MDF to cover the awful dry wall. Ben did all of the nailing... that nail gun scared me. I tried it once and about killed myself with it. Most people who do this board and batten just use a short cut by skipping this step and just attaching the vertical boards directly to their dry wall, but we couldn't do that. This step was all a bit tricky in a dining room that has walls and corners that are far from square.
 I was in charge of all the planning, designing, measuring, priming, painting and filling nail holes (some of them at least). Ben did all the grunt labor of dry walling, cutting and nailing the MDF, etc.
 The priming took FOREVER and a half. Luckily I got a tip to prime and paint all the vertical boards BEFORE attaching them to the wall. Above are all the vertical MDF boards (which we had Home Depot cut for us, thank heavens!)
 The spacing was the HARDEST part to decide. Here are the painted boards just leaned up against the wall so I could move them around to different measurements to get visuals of what looked the most aesthetically pleasing to the eye. It was hard working around the corners, outlets and window frames.
In the end, I think the board spacing between the boards was 12" on one wall, 10 or 11" on another and 14" on the third wall.
 What a trooper Logan was. We did most of our work on the dining room while the boys were sleeping except for this day.
  All the base, vertical and head boards and window frame were nailed up. It was a two person job, I had to hold the boards thing to the wall while Ben nailed in order to get a good tight pull into the wall to avoid ripples in the flat sheet of MDF.
Then it was time to fill in ALL of those nail holes with spackle. Then the spackle had to be sanded down.
 Here's what it looked like with everything just primed, ready to be painted.
 Then it was time for final coats of paint (Glass of Milk White by Martha Stewart). I think I stayed up until 4 am this night, in order to stay on track with our schedule to be done by Thanksgiving time. What took the longest was cutting in all the edges of the vertical boards.
 This is what our kitchen looked like for a while until we could get the time, energy and money to start on the cabinets. And here you can see the shelves that Ben put under our cabinets when took out the drawers.
18.) New faucet! It was a gift for Ben's birthday from VERY good friends, Chris Kelly and Matt Jones. Up until this point we were planning on using all brushed nickel hardware on the cabinetry, but because our new faucet was oil-rubbed bronze we went with that color for everything and we love the way it turned out.

19.) Ben replaced the light fixture above the sink. Beautiful!
20.) The grand finale... Painting the cabinets!!! We started this, thinking it would be maybe a week's long process. ha ah ha. What were we thinking? It ended up taking a good, fat month from beginning to end. We started on March 22, 2011 and final pictures were taken on April 22.
 First things first - move everything out of the kitchen. EVERYTHING. Wait, didn't I just do this a few months ago when the weevils came to town? Why, yes, yes I did. :) This is what our living room looked like for a good 3 weeks, so cooking and doing dishes was just a joy.
 Next came sanding, sanding and more sanding.
Ben removed all of the cabinet doors and sanded them out in the garage while I took a trusty old palm sander to the cabinet frames.
I'll admit I was incredibly picky throughout this process because I wanted a nice end result. I didn't want sticky, tacky finish on my cabinets that makes a click noise every time you open then cabinet doors. I wanted a nice, smooth, hard finish, and so meticulous prep work and sanding was key.
 More sanding.
You can also see the trim that Ben had to replace on some of the fronts of the cabinet frames.
 Then it was time to rebuild the top of our cabinetry. I was SO glad to see this nasty thing go! We were so afraid to pull this off for fear of finding dead rats or who knows what else. Ben has learned over the past 5 years, to fear uncovering anything in this house because inevitably he finds some shoddy job done before that makes his job even harder.
 Then Ben put in MDF boards up to replace that old paneling to bridge the gap between the cabinets and the ceiling. And he topped it off with crown molding. We found the best place in Springville to buy wholesale crown molding.
 Here is Ben pointing to his beautiful mitered corner on the crown molding. Thanks to YouTube for walking us through it.
 Logan even got to help. here he is decked out in all his construction gear.
  He even got to help Ben use the nail gun. I think he did a better job at pulling the trigger than I did. No joke.
 After getting a very fine sand on the cabinet frames, it was time to prime and paint. This part was so meticulous. Because I wanted a harder finish, it took me forever to decide on what paint to use... oil based? Latex? It didn't help that everyone I spoke to gave me a different answer. And we also had to take into consideration that we were spraying the cabinet fronts, so whatever paint we used had to be able to go through the sprayer.
I ended up going with a waterbased Acrylic-Alkyd paint from Sherwin Williams and loved it. It was tricky to paint with , though, because it was runnier than regular latex paint (to allow it to smooth out for a better finish), so drips were a major concern when painting on a vertical surface. But in the end, I loved the result of this paint.
The hard part was timing this all, because we had to sand in between each layer. And it was cold, rainy and humid outside, so it took so long for all the layers to dry.
 Now for painting the cabinet fronts. We wanted to spray the fronts to get a nice, smooth, professional finish. So we set up a spray room in our garage using huge 12 ft plastic sheets from Home Depot. (These things are the best - they're $1.50 and cover so much!)
The doors followed teh same frocess as the cabinet frames. We had to get a smooth sand to begin with. Then prime and paint. It took the cabinet fronts even longer to dry because of the cold weather. It took about 2 days before they were dry enough to sand down after each layer. And the first layer of paint that went on was a nightmare becuase I hadn't told Ben how runny the paint was, so he propped all the doors up in a vertical position so there were drips ALL OVER. We were able to sand them out, thank goodness, and do another layer.
We ended up having to rent then borrow an airless sprayer from a friend to finish the job because the paint was taking so long to dry and we didn't want to pay for another $60 over night rental.
The dumb thing is that when I told the guy at Sherwin Williams that we were going to rent an airless sprayer to do the job, he didn't say anything about how much paint we'd need for the job. We bought one gallon at $60 (expensive, I know - but well worth it for nice paint). So we ended up having to buy a second gallon to finish the job and that barely did the job.
Above picture is looking inside the spray room from the "door".
 This is looking at the spray room from the back of the garage.
 And this is what you saw right when you walked into the garage - you walked right into the spray room.
  Then the grand day came when our hardware arrived in the mail!
We ordered all new hinges, pulls and knobs from a store on ebay that was the BEST! We payed $1 per knob, about $2 for the drawer pulls and about $2 for each hinge. I think it came to about $60 or $70 total for all the new hardware, which is super cheap compared to the hardware stores!
The whole hanging process took a lot longer than I thought it would and the spacing the double doors was really tricky, but we got it all in. Definitely a two person job.
There are a lot more little things that we did here and there that I'm not listing, but the major steps have been accounted for, so now for more final shots!


 Ben found this old coke can in our crawl space. We've kept it to remind us of how hard it has been renovating such an old house.
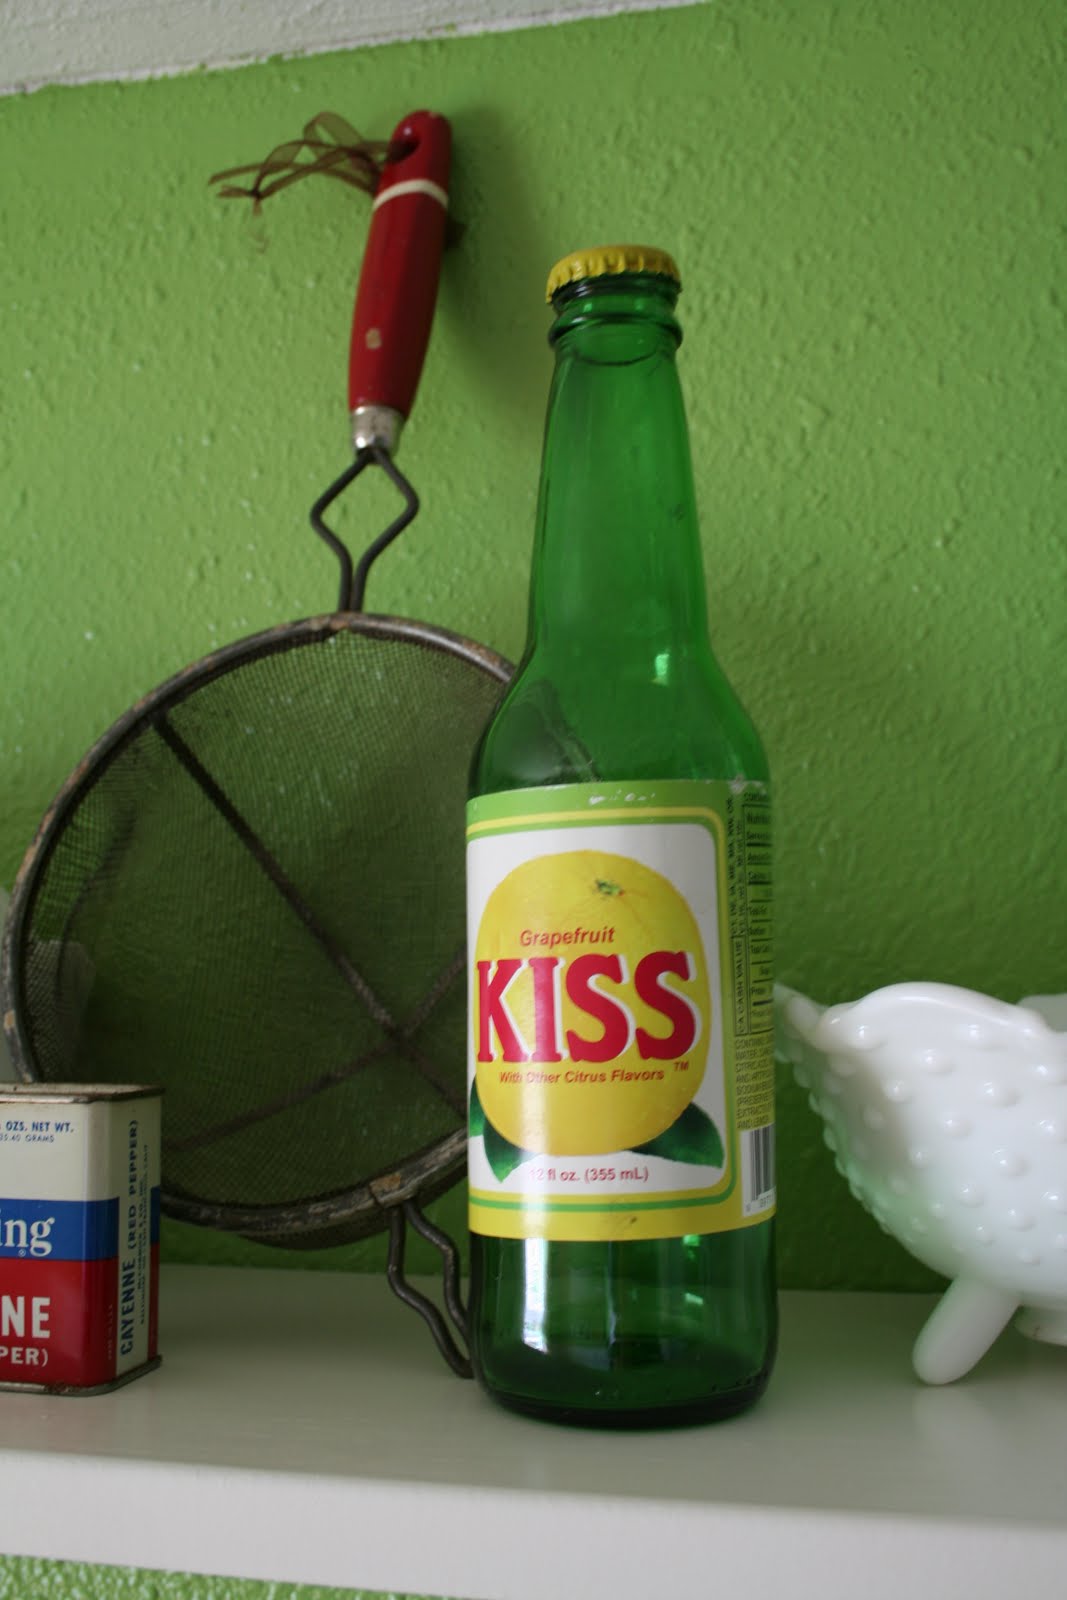 This Kiss bottle came from a fruit stand/antique mall in Thorpe, WA. Ben bought the drink for me and I loved the colors on the label so much that it became my inspiration for the whole kitchen.
 These vintage apple box labels also came from Thorpe. I had these for about two years before finally being able to hang them here in the dining room.

 The decorations are all the same now.. I had to just throw some things together so I could get these pictures taken.
 Notice the army guy on the window sill? This is from our first calling that we had as a married couple - teaching the 7/8 year olds in Primary. It came from a teacher training (it was on a cupcake) and we still have it, 9 years later. It has been in our kitchen in every place we've lived since to remind us of our commitments to serving in the gospel.
21.) Ben added more under-cabinet lighting. We've had under-cabinet lighting ever since visiting Ikea in San Diego back in 2006, but there weren't any mounted under the cabinets by our stove so Ben added more for me. Thanks hun!


In the end I think we wish we would have had the money to just gut the entire kitchen to begin with back in 2006, but we were so broke when we bought our house that there was no way that could be done. But in the end we love what we've done with this room and every hour of sweat and labor has been worth it.
We have both learned so much, Ben especially, and he has gained so much confidence in renovating projects now. He's so amazing in what all he can do. The guy can check out a book from the library, look at a few forums and websites and maybe watch a youtube video and he can tackle ANYTHING. I'm so lucky that I have him at my side for a handy man. Thanks for turning my kitchen into a room that I LOVE to be in now. I'm sad thinking that one day in the near-ish future I'll have to part with my cute kitchen.
And a BIG thanks to all who have helped along the way!
16 comments:
Oh My Heavens!! Your kitchen looks GREAT!! You guys did such a great job- the time and effort you put into it to make it perfect seems worth it now! It is beautiful!
Holy cow what a project!! I love the end result though and I LOVE the colors!! Great job!!
I knew you guys could do it - and your marriage is still thriving.
Horray for you. I, too, have a handyman and they are something of a treasure. You have really accomplished one of your dreams Kris. Love it and can't wait to see it.
Kristi! It looks amazing! Like straight from a magazine amazing. I love how clean and simple it is. And all the decorations are awesome. I love the coke can. Want to come decorate my house??
Wow! It looks amazing! A ton of work for sure, but well worth it. I love the colors and decor--this remodel could totally be in a magazine. Are you guys planning to move?
Wow! Amazing. The after looks like it is from a magazine!
I read every word. And now I need to go take a nap! That post just made me exhausted. We haven't done anything to our house, okay, well Brandon did retile the entire upstairs bathroom and shower while I was at Girl's Camp two years ago, but man, our kitchen could definitely use some help. But we are not fixer upers and hey, we're moving out next week so oh well. :) Anyway, I am totally coming to your house. I've been wanting to come over anyway, but I've gotta see that kitchen in person!!! I'll be over today when Mckinley wakes up. Hope you're home!! (I might text or call first in case you don't get this post in the next hour.)
This looks phenomenal. I can't imagine how satisfying it would be to be finally finished!
It looks wonderful!!! very proud of you guys. I am going white with my old cupboard too, great minds you know....;) hopefully I'll have pics soon too!
thanks for the inspiration!
Torrie
I love it kris! It looks like it should be in a magazine- great job!
It looks absolutely fabulous! So bright and cheery! I LOVE it! These kind of projects are always so much harder and more time consuming than you think it will be. I bet you are thrilled to have it done.
You guys are amazing and inspiring!! Nicely done!! Can't wait to see it in person sometime!!
i just saw your link from facebook-- your kitchen is so cute! I have fear for the day we start tearing apart our bathroom upstairs-- we might need some serious therapy after that! I have to say that there is a lot of satisfaction from "DIY"-- to look at a completed project and be able to say "yep, we did that!" feels so good! I loved my white cabinets in Texas (:
It looks AMAZING! Great job!
Amazing!!! Great job-love the colors.
Wow, I knew that your kitchen went through phases to completion, but I had no idea of just how much work it really was for you guys, or how long you'd been working on it. The results are amazing.
Post a Comment